This is the first part of a two part series of articles. This first article outlines how to configure an ECS cluster that runs a very simple python-based web application. The second article in this series will outline the process of configuring a full Continuous Deployment pipeline that starts with a BitBucket merge and uses a Jenkins job to deploy changes to the ECS cluster.
Note that several steps in this article are Mac OS X specific and will need to be adapted for Windows and Linux operating systems.
Prerequisites
Install AWS CLI Tools
Follow the instructions here: https://docs.aws.amazon.com/cli/latest/userguide/cli-install-macos.html#install-bundle-macos
The AWS CLI tools provide a way to control virtually everything in AWS in lieu of the AWS Console. They're really quite powerful and useful in automating tasks. The AWS CLI tools run on Python 2 and 3. Make sure you have Python installed on your machine, as well as pip. Once you've got that going, all you need to do is run the following command:
$ pip install awscli --upgrade --userOnce the installer has completed, run the following command to make sure the process worked. It should print out the version information for the AWS CLI tools on your machine.
$ aws --versionConfigure AWS CLI Tools
In this step we're going to configure the AWS CLI tools with the appropriate IAM permissions for pushing Docker images to ECR.
For the following steps in the process, I'm using these tools on my personal laptop so I'm going to use my admin credentials for my test AWS account. This is usually not a good idea when working with production systems, especially once we start working with a Jenkins server in the second post in this series.
For the sake of security, I recommend creating a new IAM user specifically for the purpose of pushing Docker images to ECR. At minimum, the IAM user will need certain ECS permissions and ECR write permissions, ideally restricted to the appropriate ECR repository. Here's a policy that will have all the required permissions for the initial push to ECR as well as the automated Jenkins processes contained in part 2 of this series:
{
    "Version": "2012-10-17",
    "Statement": [
        {
            "Sid": "ECR_Perms",
            "Effect": "Allow",
            "Action": [
                "ecr:CompleteLayerUpload",
                "ecr:DescribeImages",
                "ecr:UploadLayerPart",
                "ecr:ListImages",
                "ecr:InitiateLayerUpload",
                "ecr:BatchCheckLayerAvailability",
                "ecr:PutImage"
            ],
            "Resource": "arn:aws:ecr:us-west-1:xxxxxxxxxxxx:repository/flask-app"
        },
        {
            "Sid": "ECS_Perms",
            "Effect": "Allow",
            "Action": [
                "ecs:UpdateService",
                "ecs:RegisterTaskDefinition",
                "ecr:GetAuthorizationToken",
                "ecs:DescribeServices",
                "ecs:DescribeTaskDefinition"
            ],
            "Resource": "*"
        }
    ]
}
Once you've got an IAM user set up with the appropriate permissions, run the following command and follow the prompts to configure the AWS CLI tools:
$ aws configureSet up Elastic Container Registry (ECR) Repository
1. Open the Elastic Container Service dashboard in the AWS console and select Repositories from the left hand menu
2. Enter "flask-app" for the repository name and click the Next step button
3. You will be presented with instructions on how to push an image to your new repository:
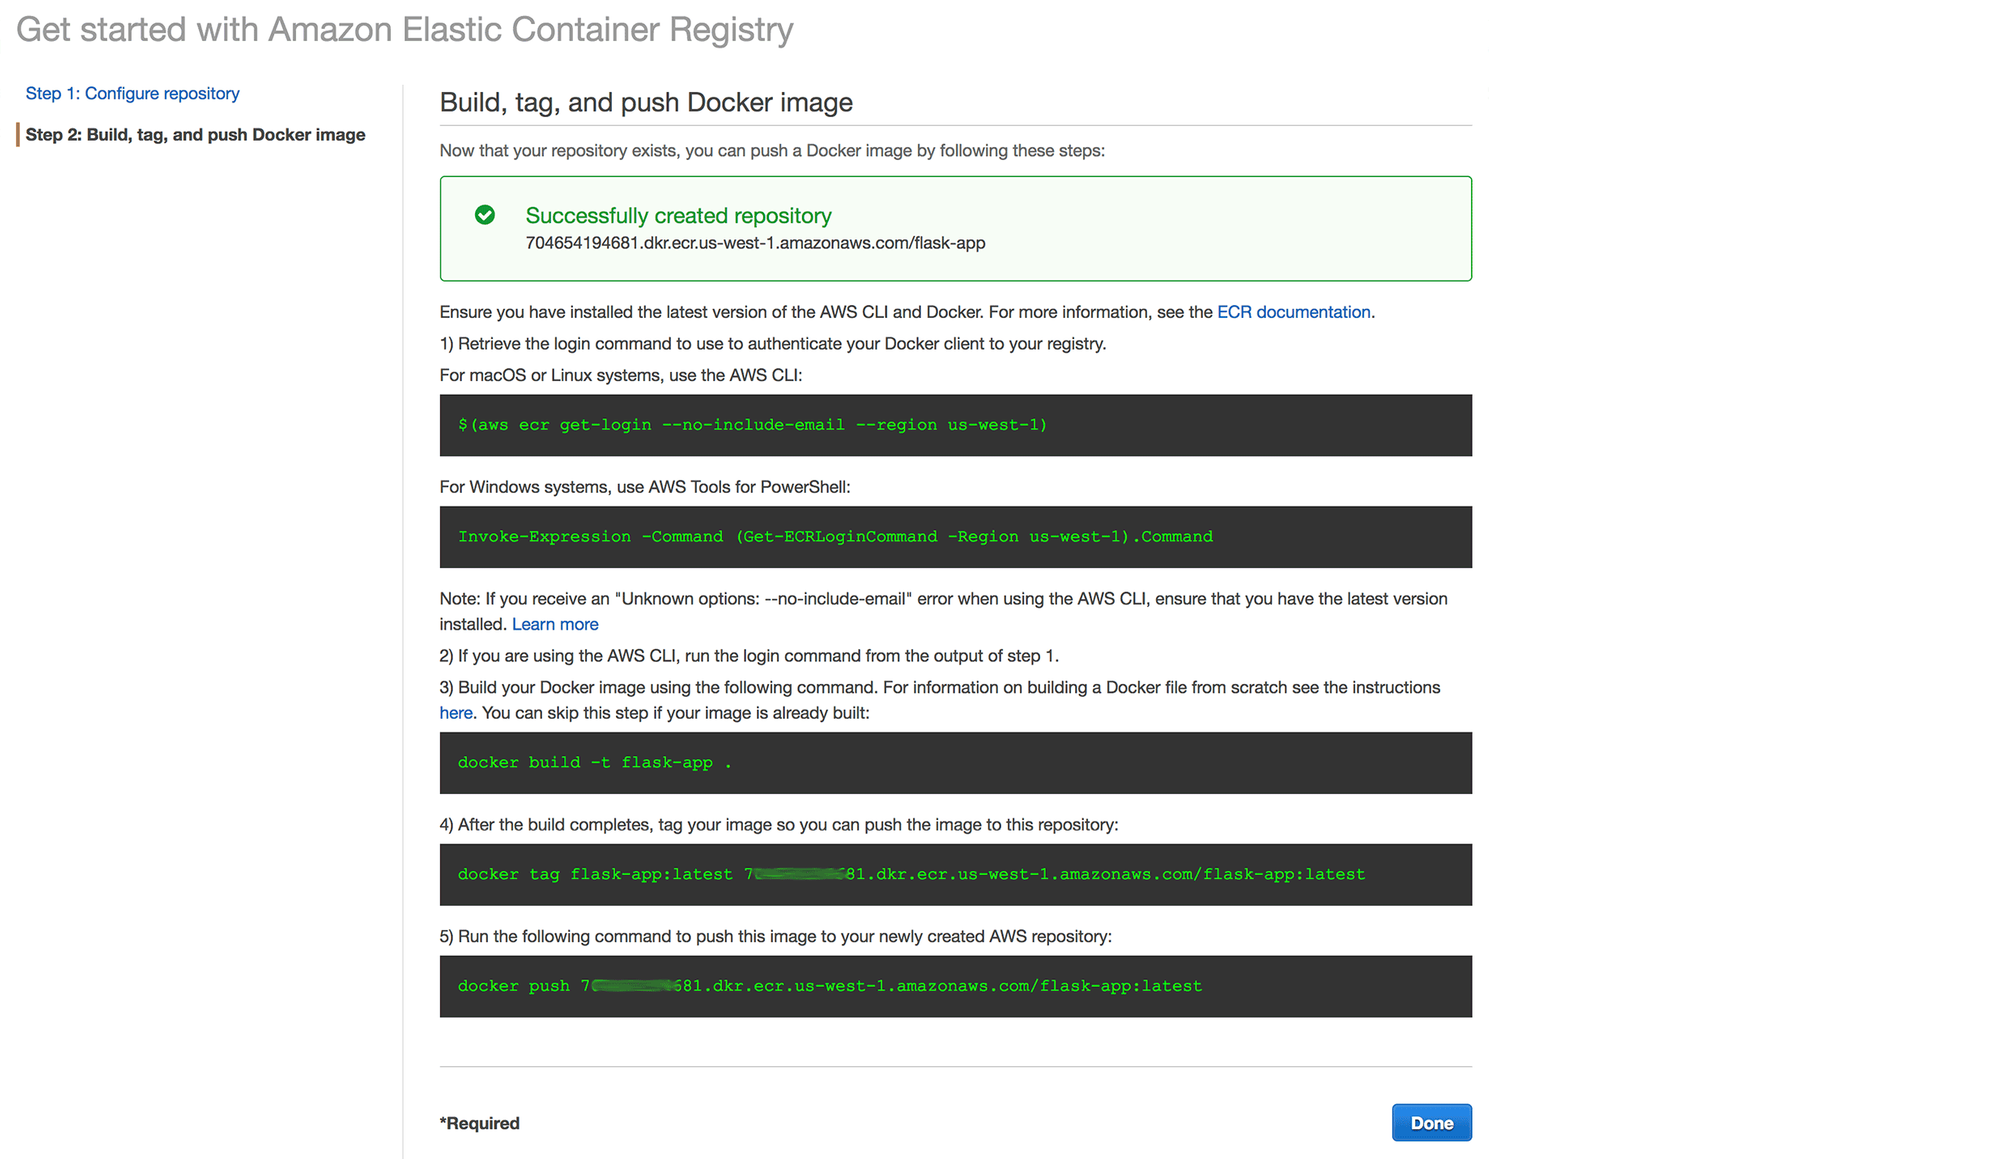
Next, we'll push an initial Docker image to our new ECR to allow creation of the task definition and service through the AWS console.
In this example I'm going to use a sample project that I created for one of my earlier articles. The project can be found here: https://github.com/abakonski/docker-flask
The process of creating and pushing the Docker image to ECR may look something like this:
cd /path/to/project/

# Log into AWS, using credentials created using "aws configure"
$ $(aws ecr get-login --no-include-email --region us-west-1)

# Build the Docker image
$ docker build -t flask-app:0001 .

# Tag the image, prefixing it with the ECR registry address
$ docker tag flask-app:0001 xxxxxxxxxxxx.dkr.ecr.us-west-1.amazonaws.com/flask-app:0001

# Push the image to the ECR registry
$ docker push xxxxxxxxxxxx.dkr.ecr.us-west-1.amazonaws.com/flask-app:0001
You should now be able to see the image in ECR:
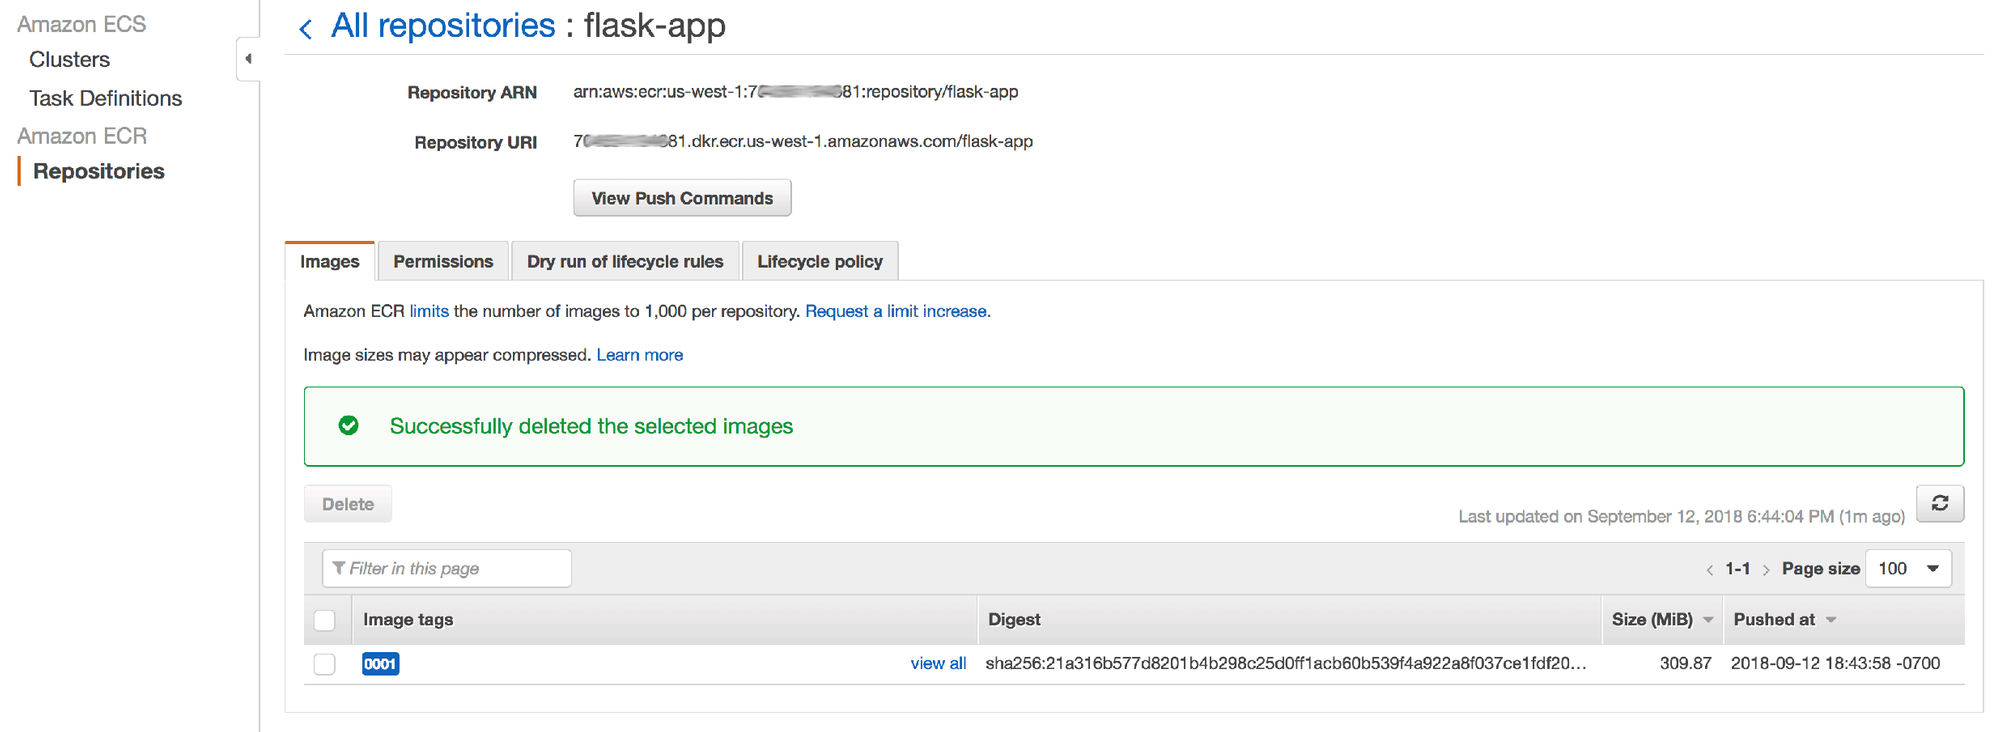
NOTE: we'll be using the Repository URI from the above screen later in the process.
Set up an ECS Cluster
Now that you've got ECR configured with an initial image sitting inside it, let's set up our first cluster.
A very simplistic overview of ECS Clusters is that a Cluster is a logical grouping of one or more Services, each of which comprises one or more instances of a Task. A Task is made up of one or more Docker images.
As an example, you could define Task A to be a web app image. Task B could be a Varnish server. Service A would be configured to run 3 instances of Task A, while Service B will run a single instance of Task B. These two services will then be grouped into a single cluster, and the result would be a Varnish server that serves a web app that runs on 3 load balanced instances.
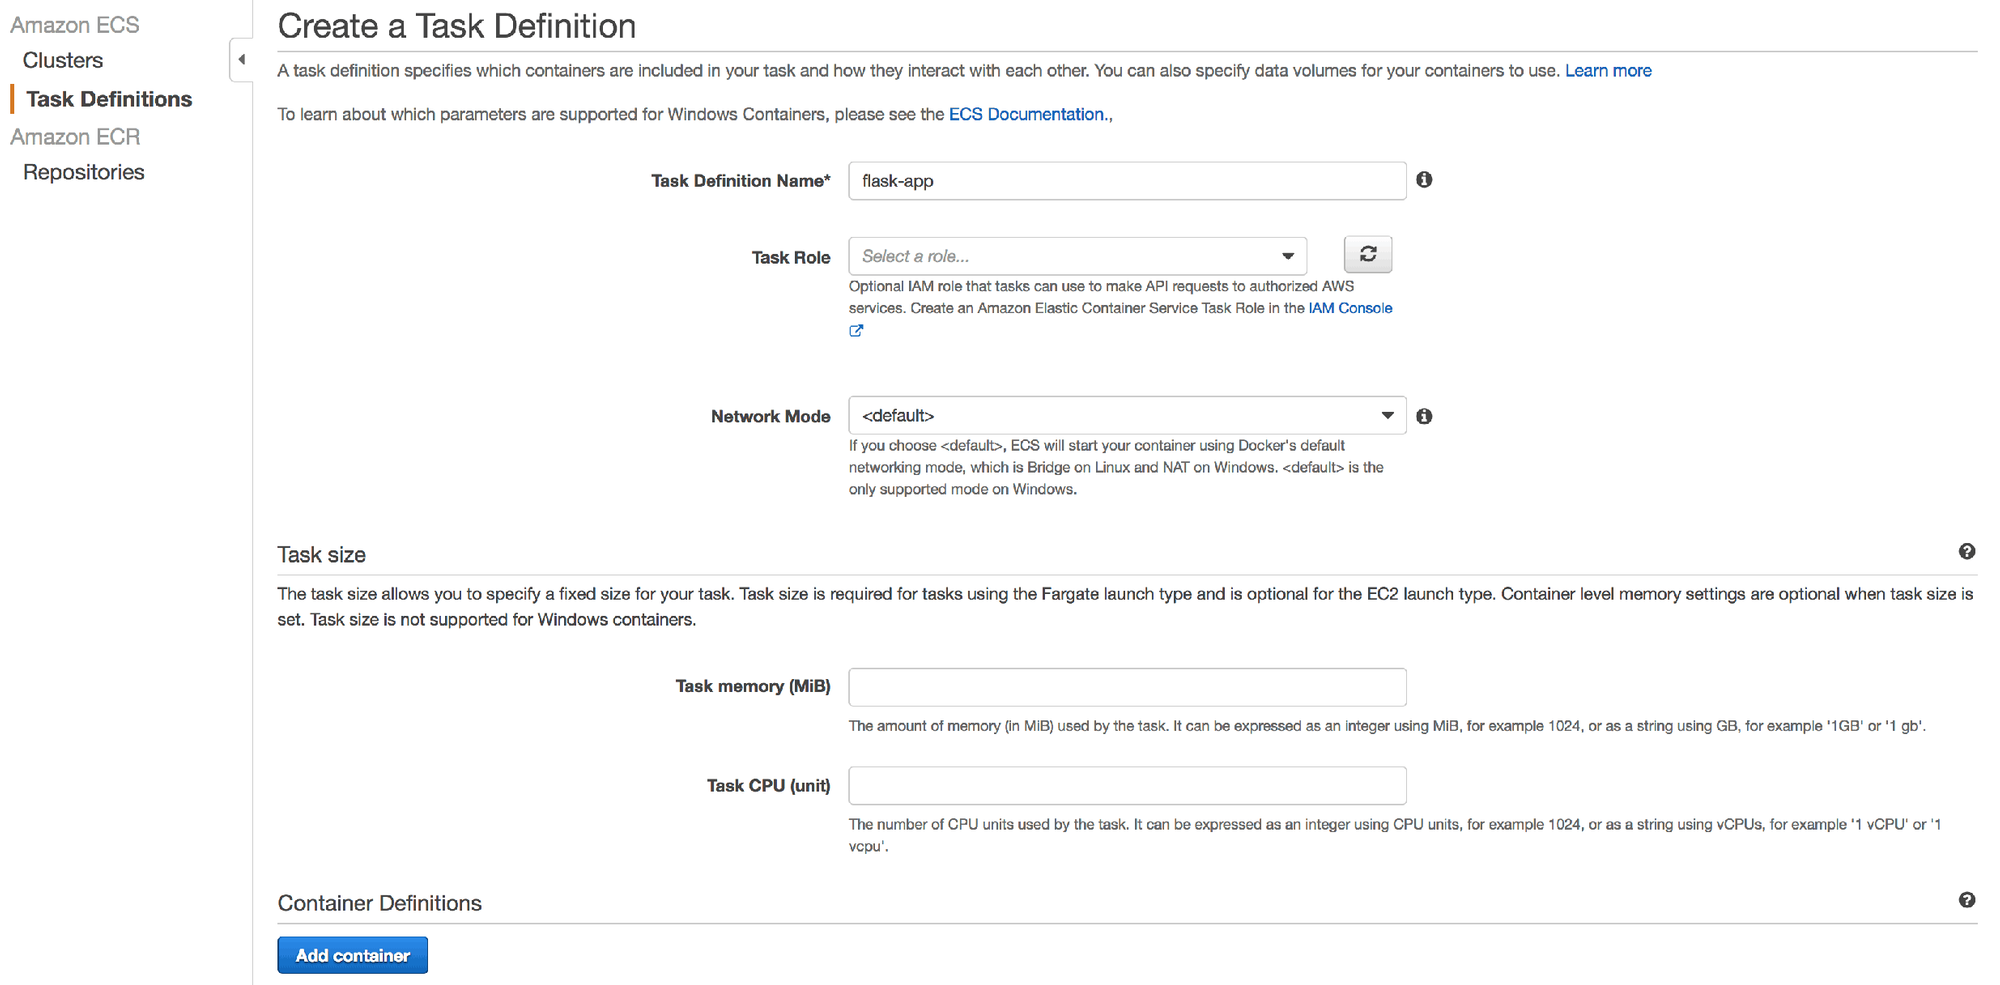
Create a Task Definition
ECS Task Definitions do what their name suggests: they define a task. A task is typically a microservice, though it could comprise multiple microservices.
In this section we'll create a Task Definition for our flask-app example.
1. In the Elastic Container Service section, open the Task Definitions screen and click the Create new Task Definition button.
2. Name the task definition "flask-app-task" and move on to adding a container. There are some advanced settings here, but we'll leave these alone in this example.
3. Click Add Container
4. Use "flask-app" for the container name
5. There are 2 things we need to enter into the Image field. First, paste the Repository URI from earlier in the process. Next, add a colon (":") and the image tag (in this example, we used "0001" as the tag for our initial image).
6. We're going to use a somewhat arbitrary value of 500MB for the hard memory limit. The app we're using should theoretically never reach anywhere near this limit.
7. The rest of the form can be left with mostly the defaults
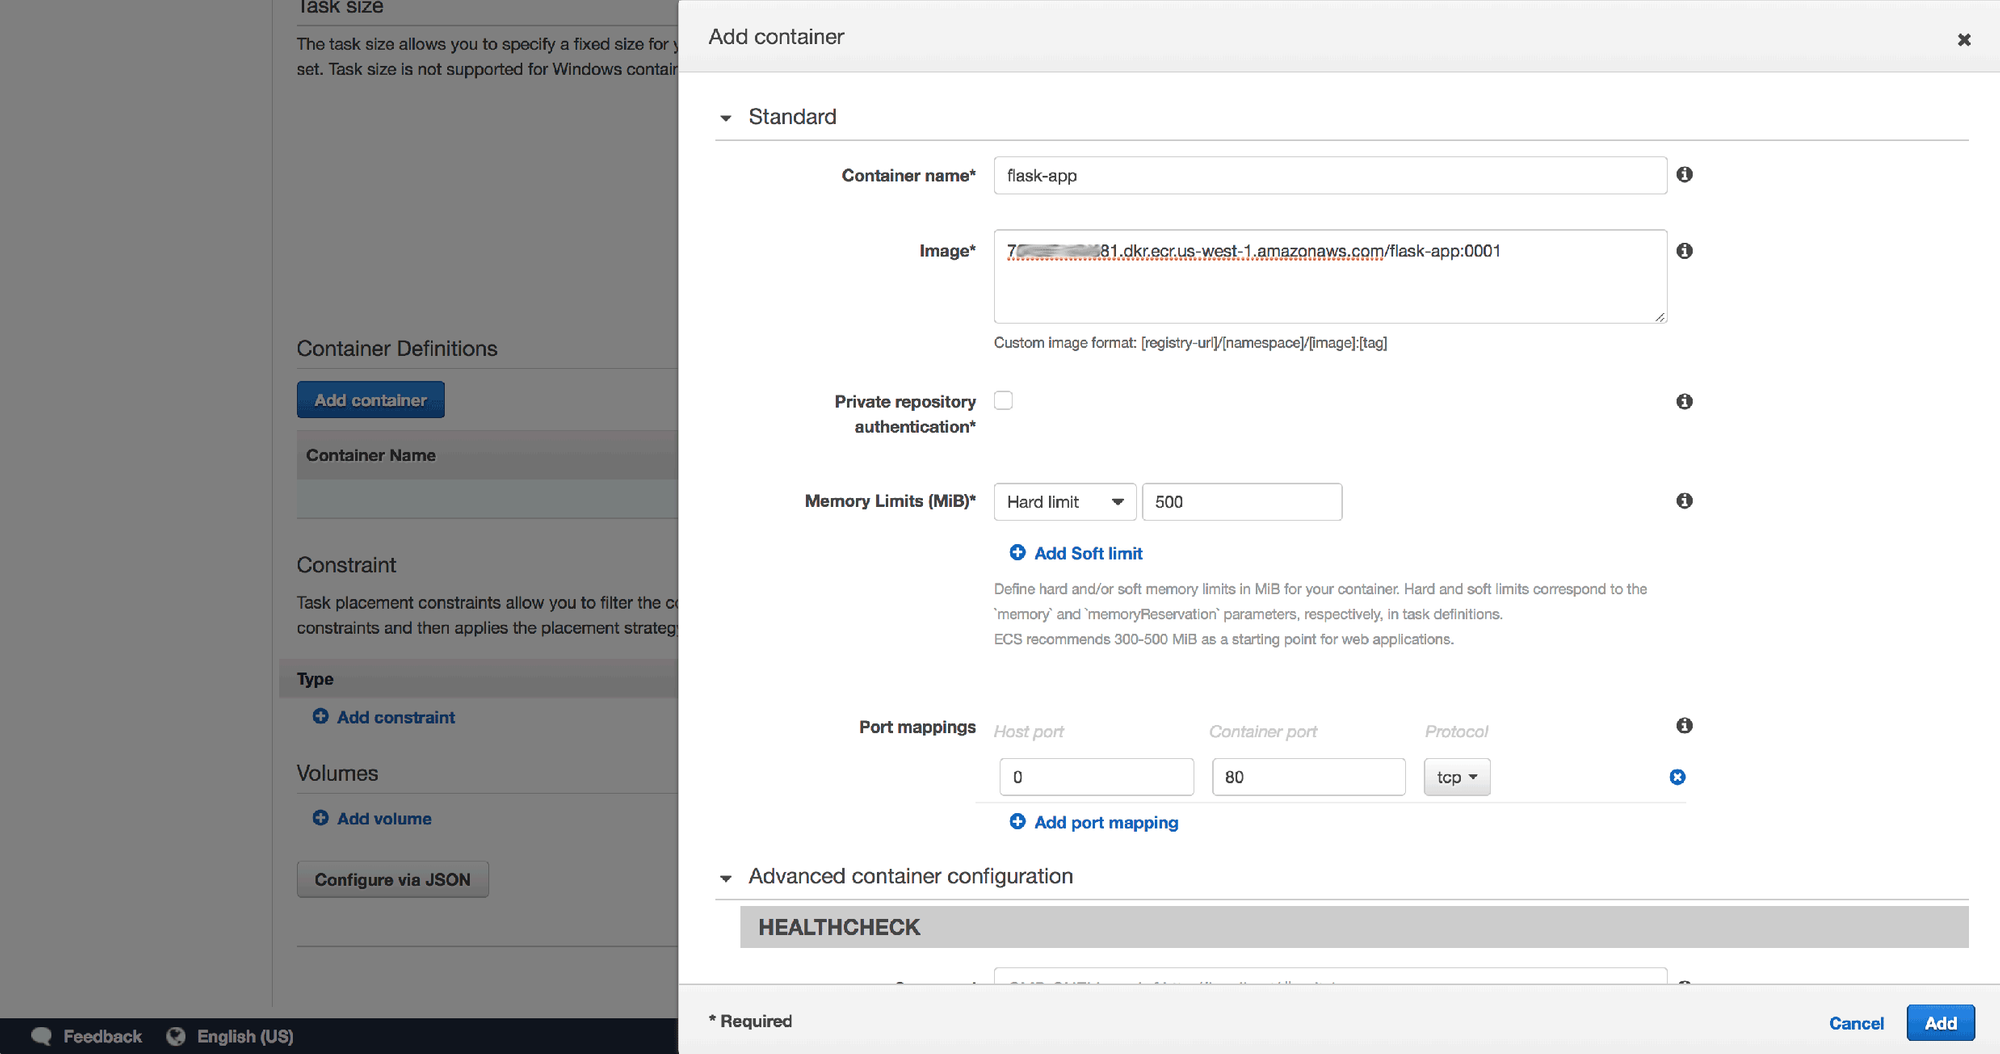
8. Once you've added the container, use the default values for the rest of the form and click Create.
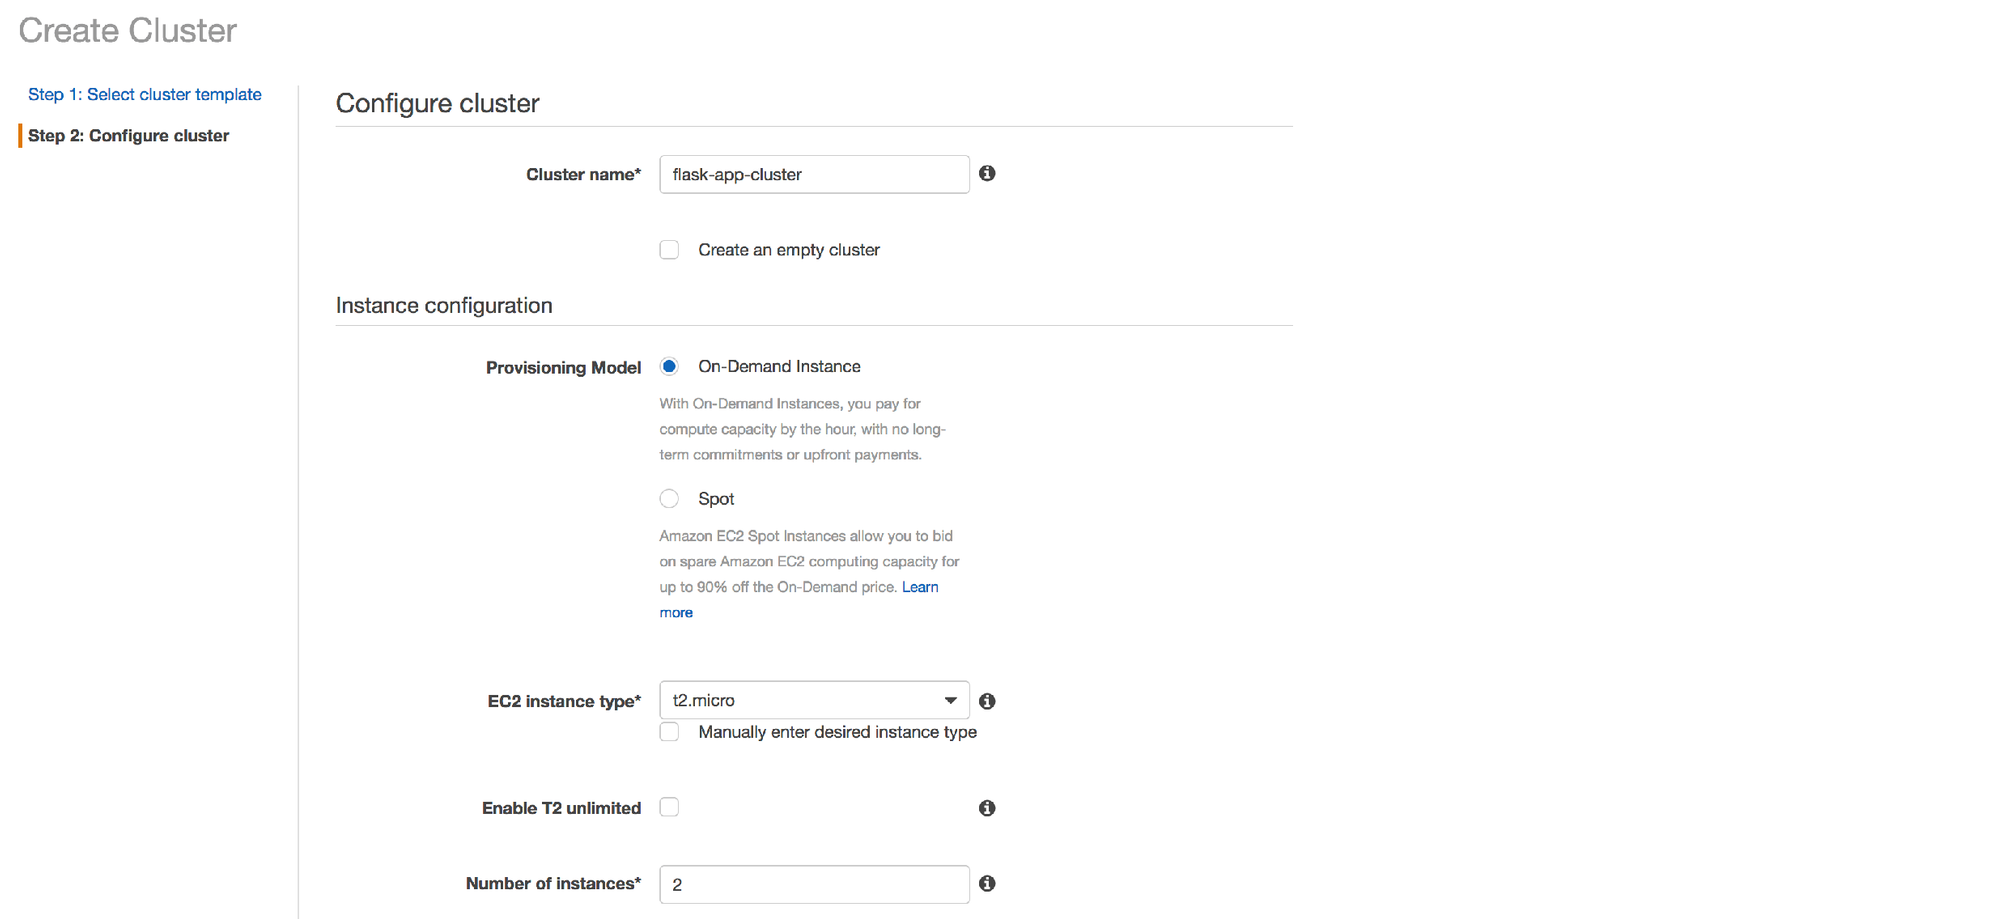
Create the Cluster
1. In the Elastic Container Service section, open the Clusters screen and click the Create Cluster button.
2. Choose EC2 Linux + Networking and click Next step
3. Use "flask-app-cluster" for the cluster name
4. Choose the "t2.micro" instance type and "2" for number of instances. We're keeping things very cheap and basic for this example.
5. Under the Key pair field, follow the link to create a new key pair and follow the prompts. Once created, click the refresh button next to the Key pair field and select your new key.
NOTE: Save your new key somewhere safe for future use. This is important as this key is the only way you will be able to connect (via SSH) to the EC2 instances in this cluster.

6. Choose your default (or another appropriate) VPC and at least 2 subnets within it
7. Select the option to create a new security group and use the port range "0-65535".
NOTE: this isn't the ideal way of setting up the security rules. We're opening every port for all inbound traffic because in the next section of this process we're going to use dynamic port mapping between ECS and the Docker containers. In a production system, we would create a custom VPC with much stricter traffic rules, NAT gateways and bastion instances (for SSH connections), etc, but we'll leave all of these more advanced topics for a future post.

8. Choose the "ecsInstanceRole" for Container Instance IAM Role
9. Click Create
Create an Application Load Balancer
Since we're starting multiple (2) instances of our app, we'll need to set up an Application Load Balancer to allow HTTP access to both of these containers under a single endpoint.
1. Open the EC2 Dashboard, select Load Balancers from the left hand menu and click on Create Load Balancer
2. Click the Create button under the Application Load Balancer option
3. Enter "flask-app-lb" as the name
4. Leave the scheme as "internet-facing"
5. Select the "HTTP" protocol.
NOTE: In a production scenario, you'd most likely use HTTPS, but for the sake of this guide, we'll keep it simple.
6. Select your default VPC and choose at least 2 subnets/availability zones
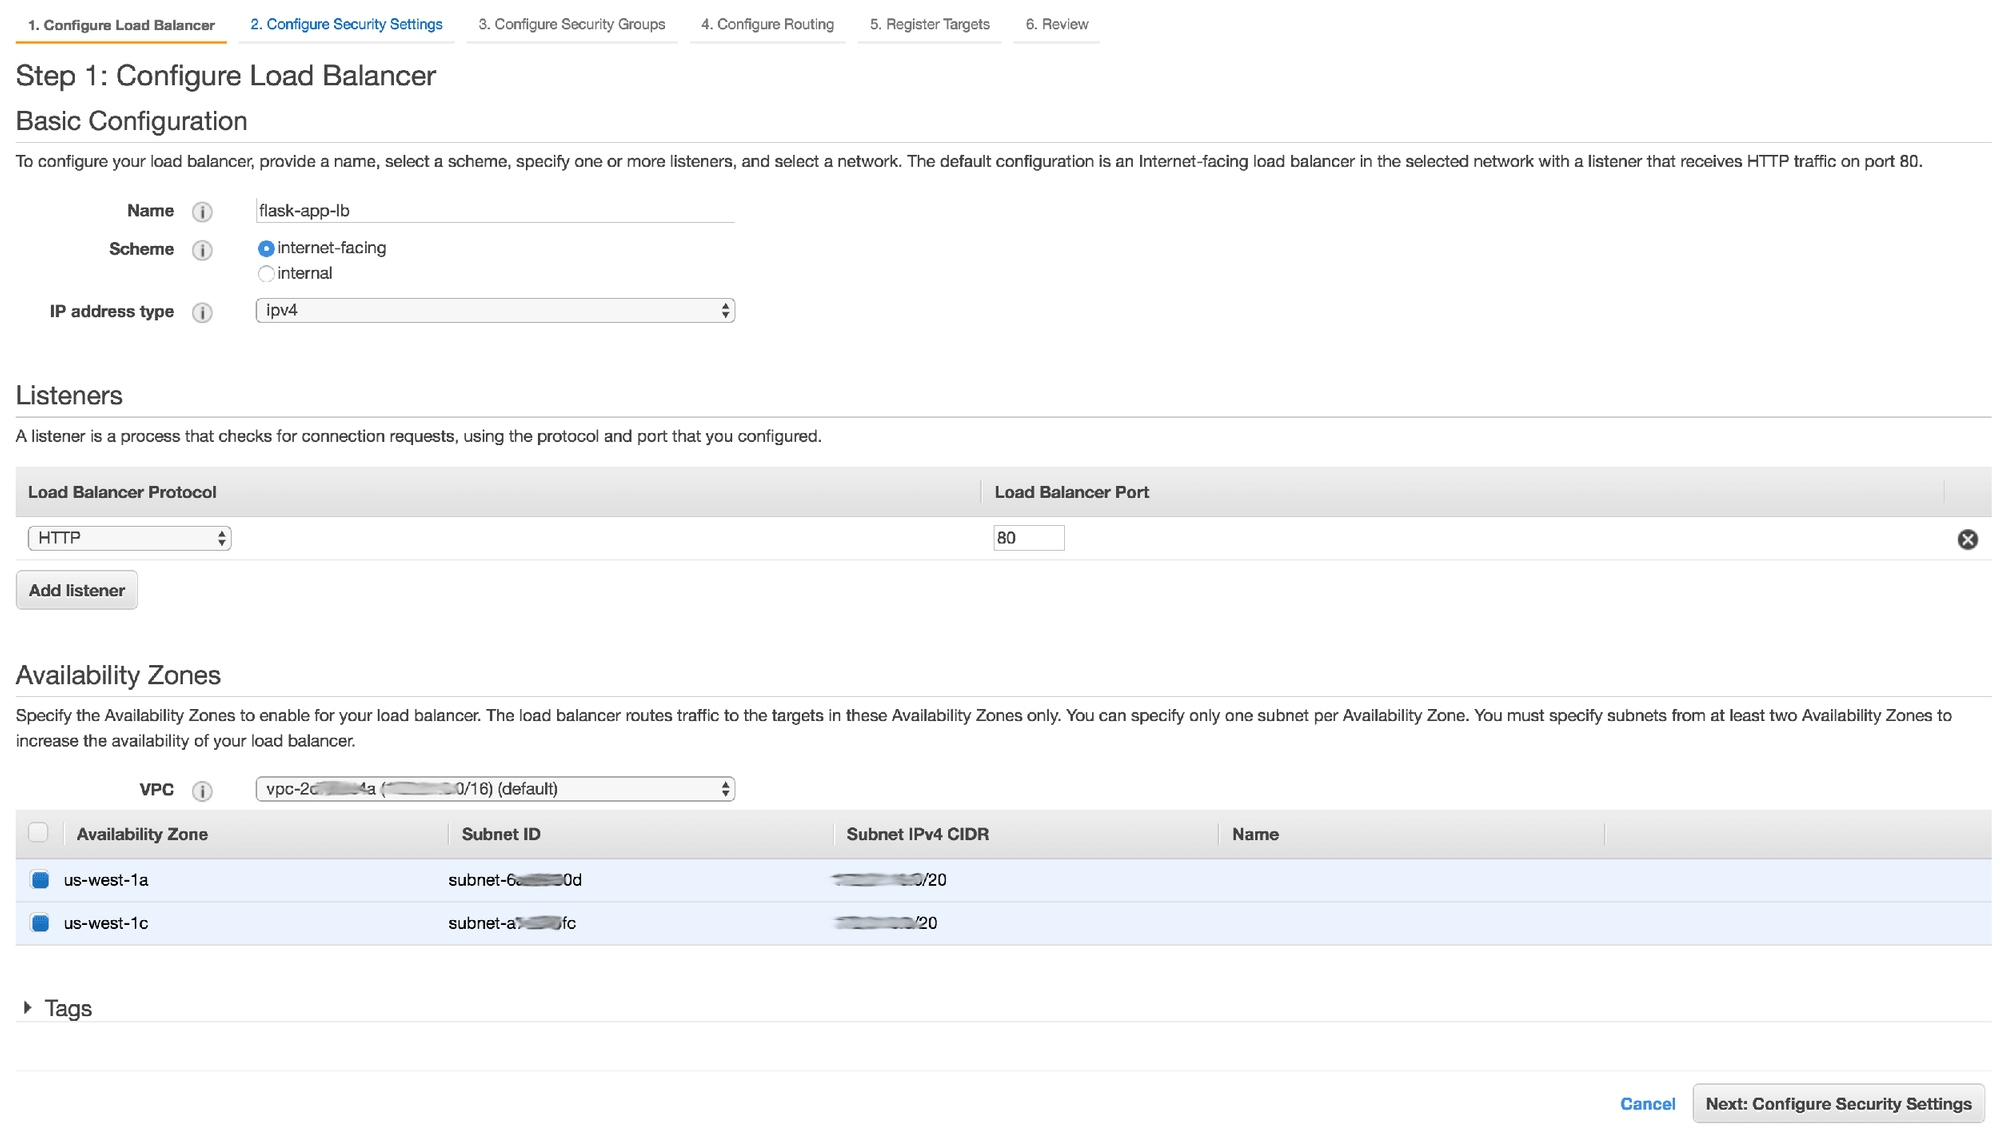
7. Click the Next: Configure Security Settings button to continue through the wizard
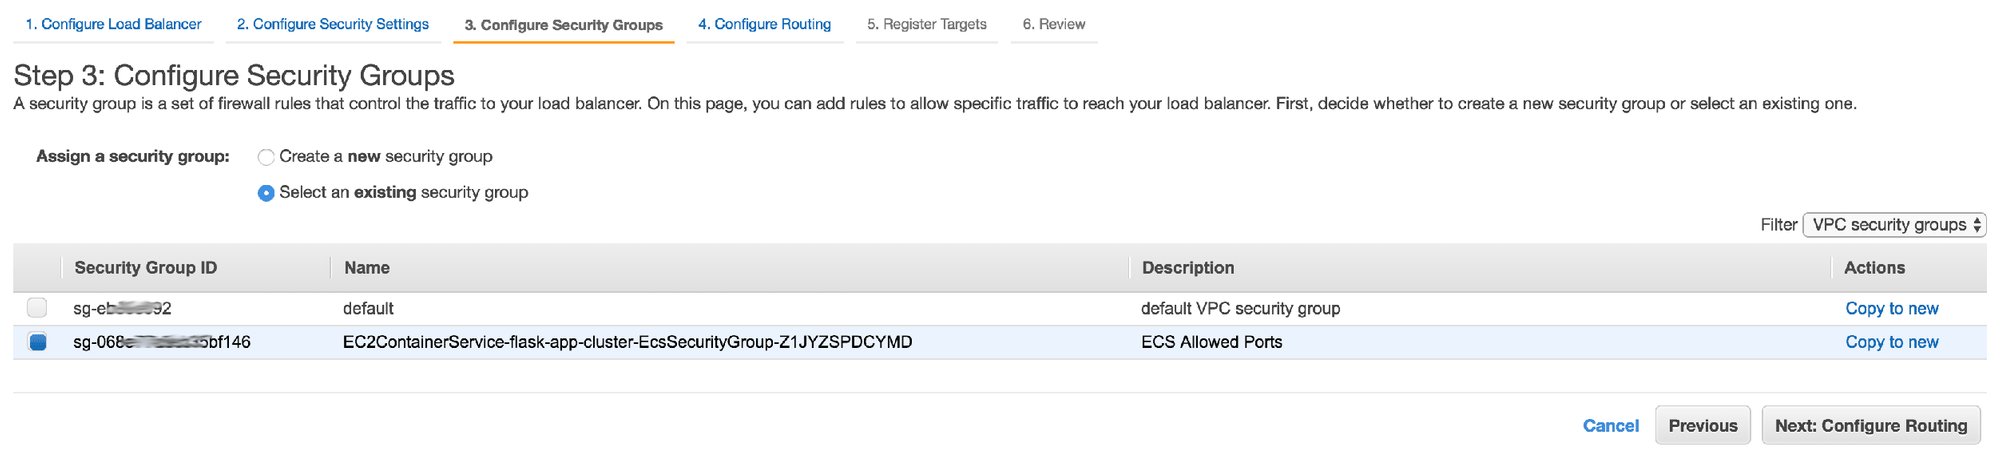
8. Because we only selected the HTTP protocol in step 1, step 2 will contain a suggestion to improve security through the HTTPS protocol. We'll ignore this suggestion for this example and move on to step 3
9. In step 3, choose the security group that was automatically created earlier while setting up the cluster, then continue to the next step in the wizard
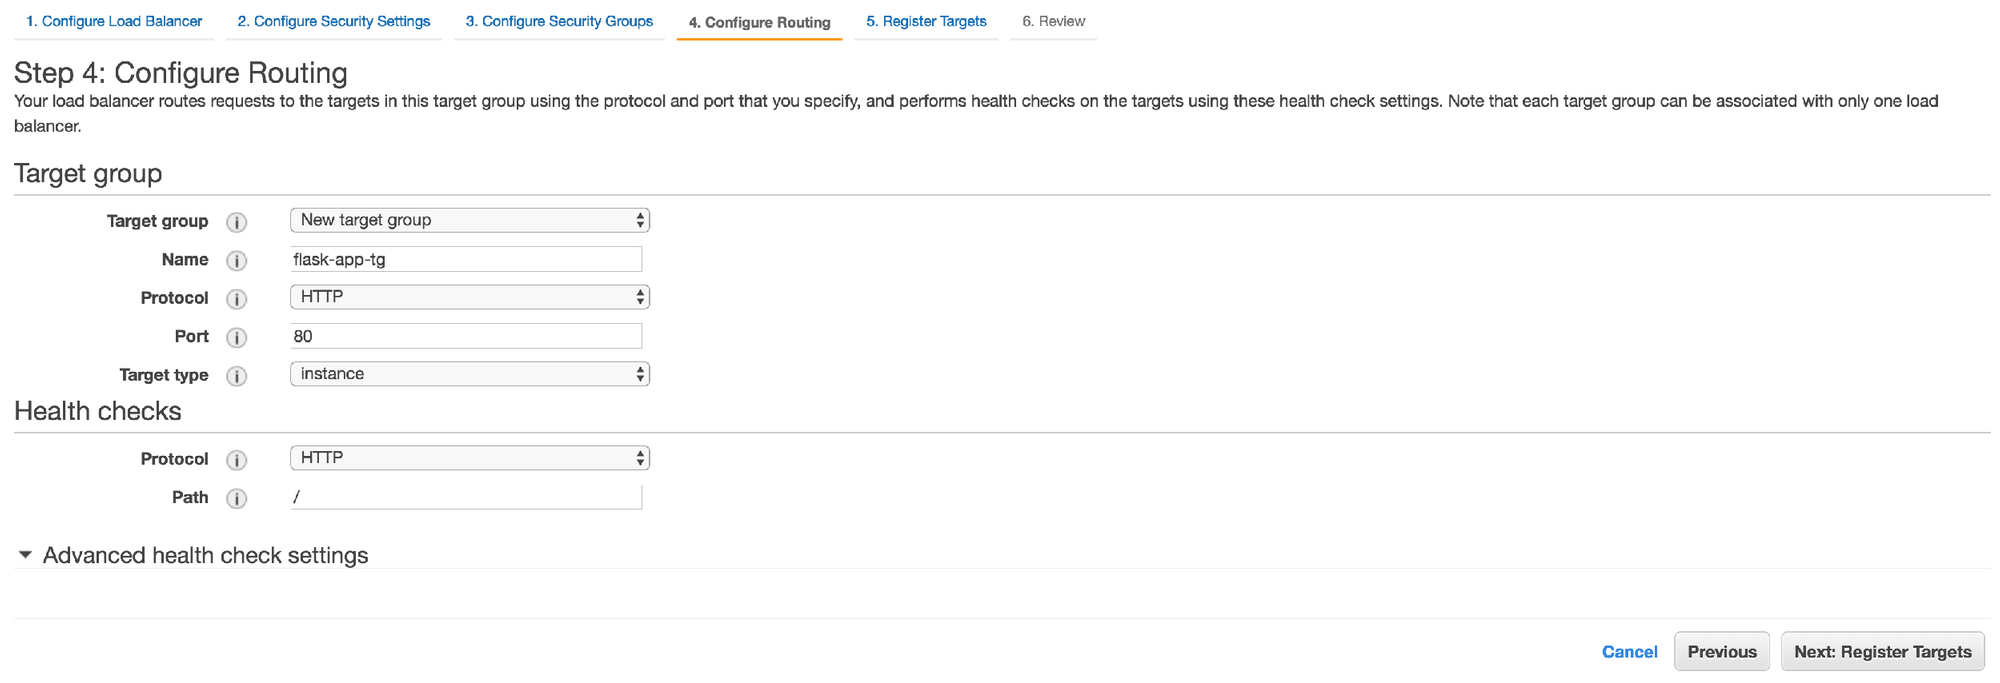
10. In step 4, create a new target group with the name "flask-app-tg" and use the "HTTP" protocol. Use the default values for the rest of the form and continue to the next step
11. In step 5, you should see 2 EC2 instances that were automatically started as part of the cluster creation process. Select them both and continue to the final step in the wizard
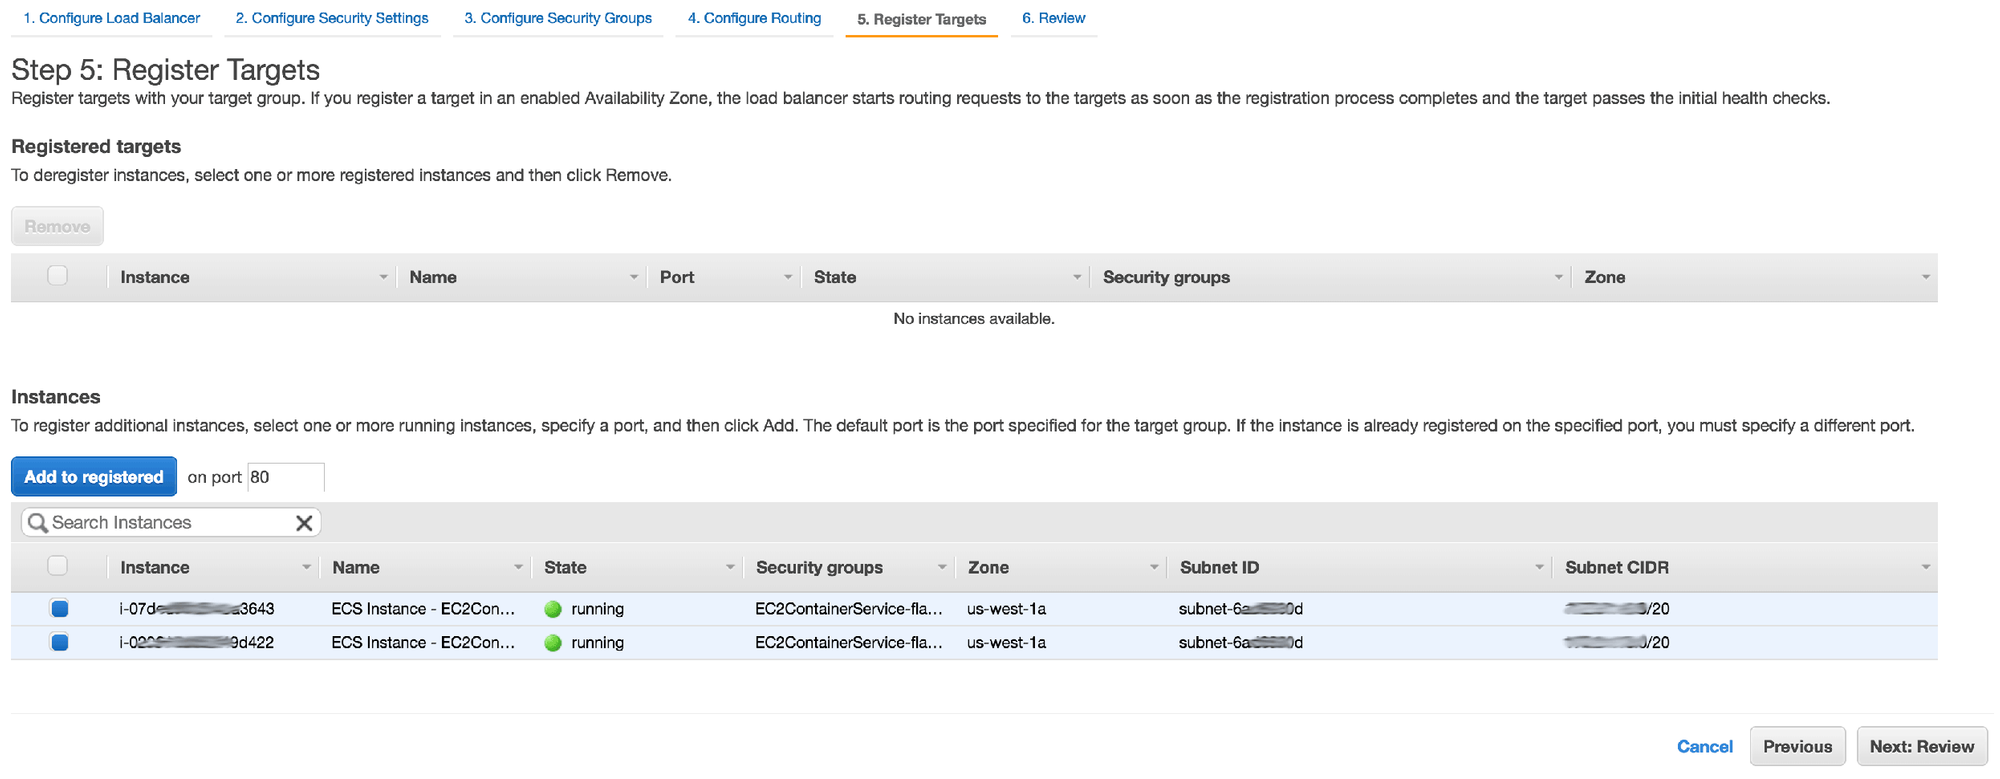
12. Review the configuration summary in the final step and click Create
Create a Service
1. Once the cluster setup completes, click the View Cluster button. Alternatively, go to the Clusters screen and click on the "flask-app-cluster" cluster that you just created
2. On the Services tab, click Create
3. Choose the "flask-app-task" task definition and "flask-app-cluster" cluster. Use the service name "flask-app-service"
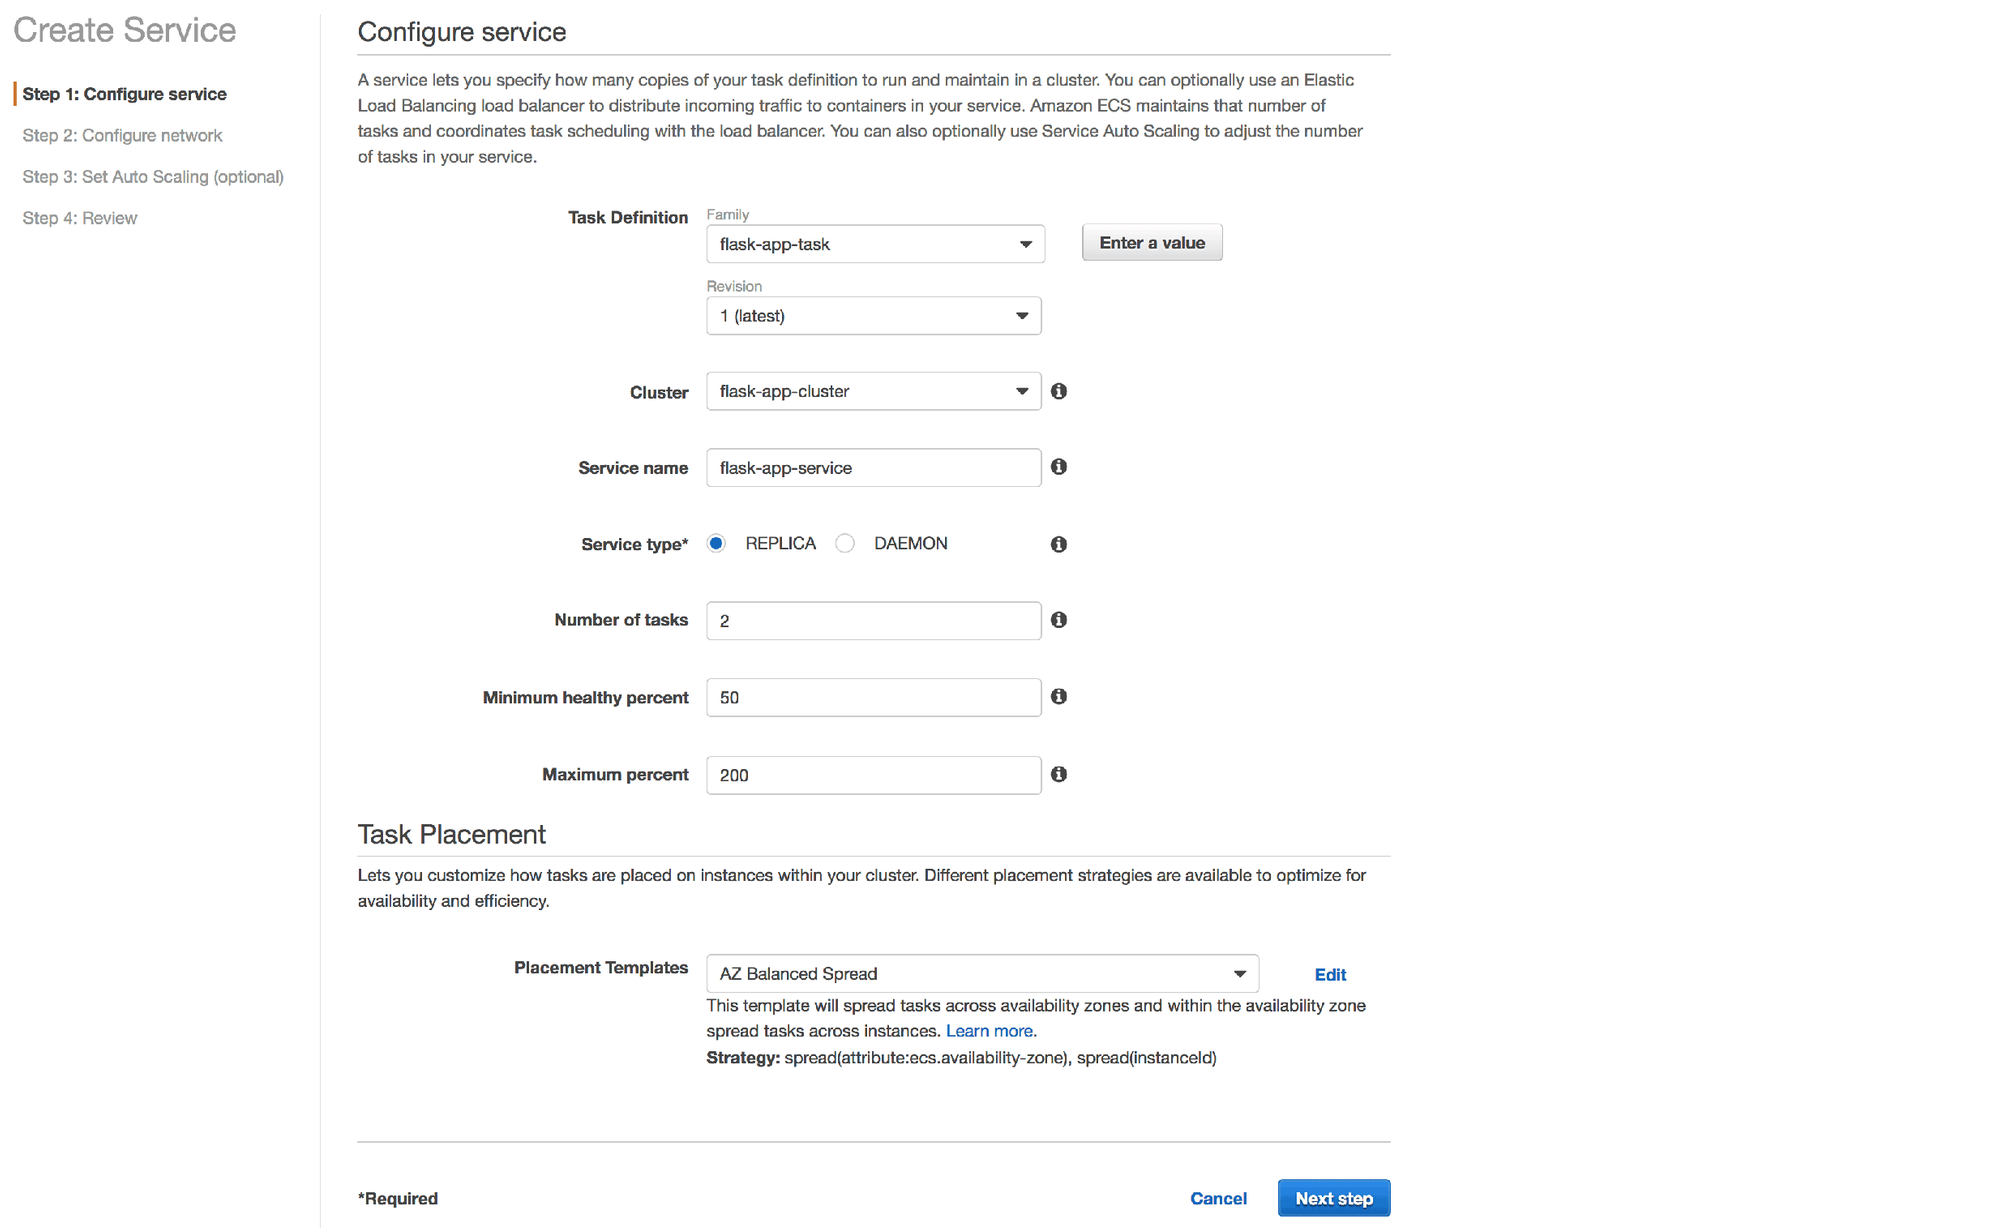
4. Use the default "AZ Balanced Spread" placement template.
5. Click Next step
6. Select the Application Load Balancer type, leave the IAM Role set to "Create new role" and choose the "flask-app-lb" load balancer that we created earlier
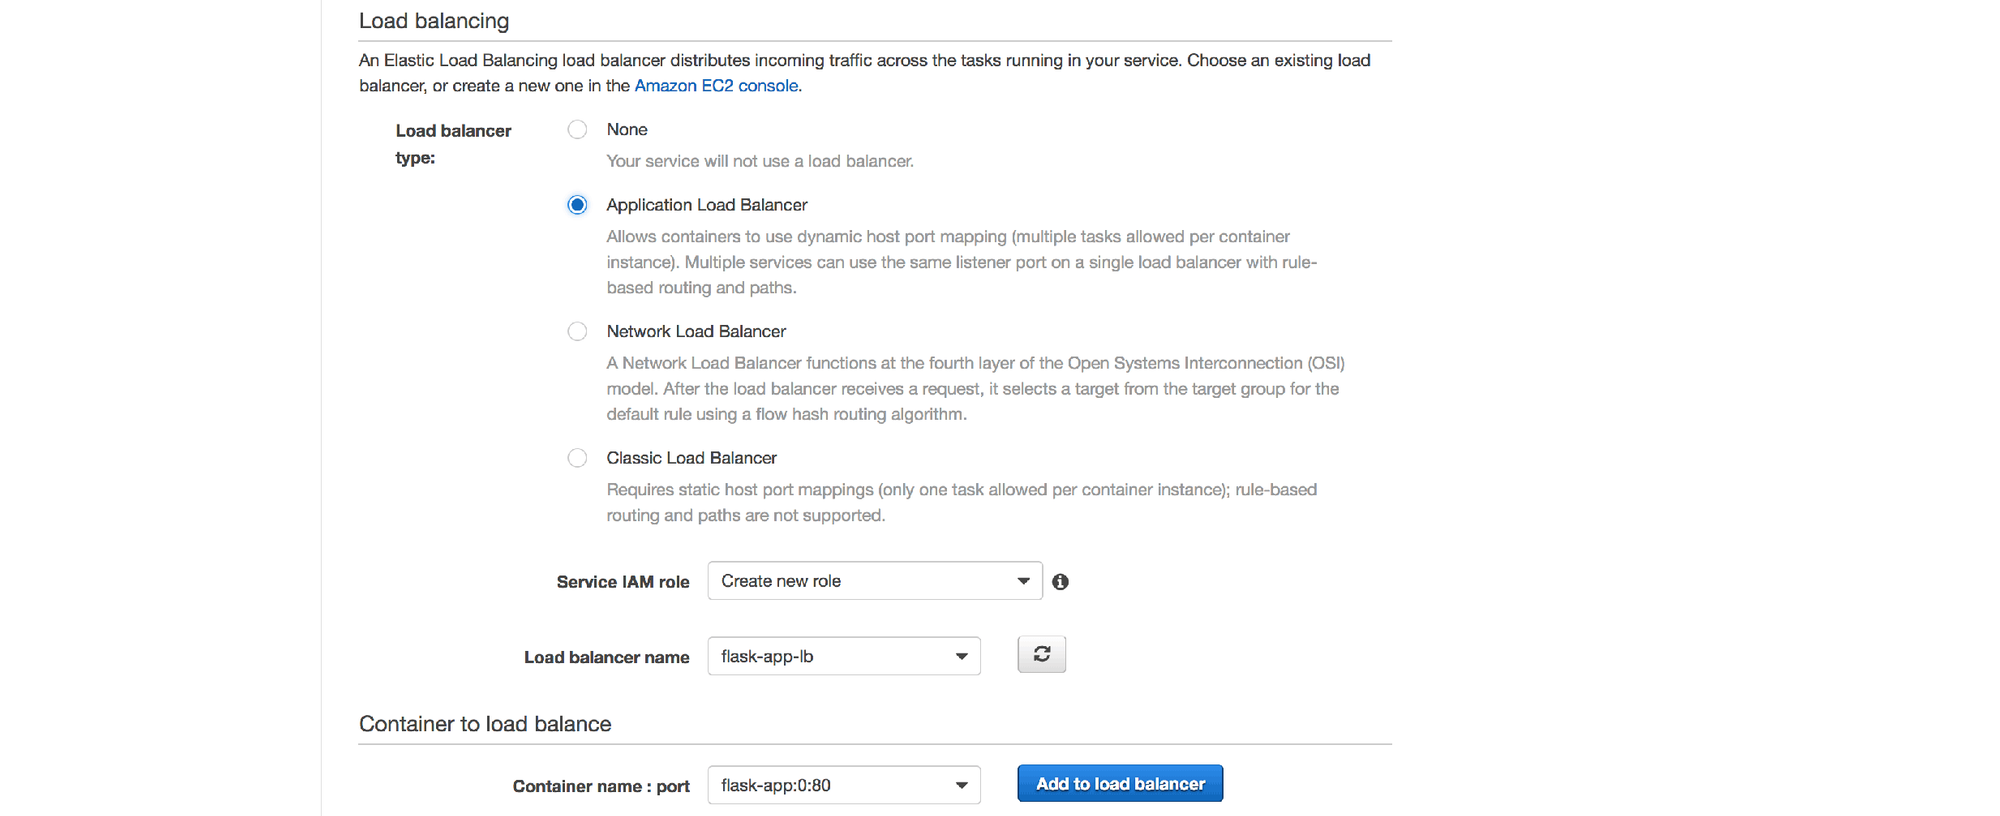
7. Click the Add to load balancer button
8. Select the "flask-app-tg" target group and leave the other fields in this section with their default values
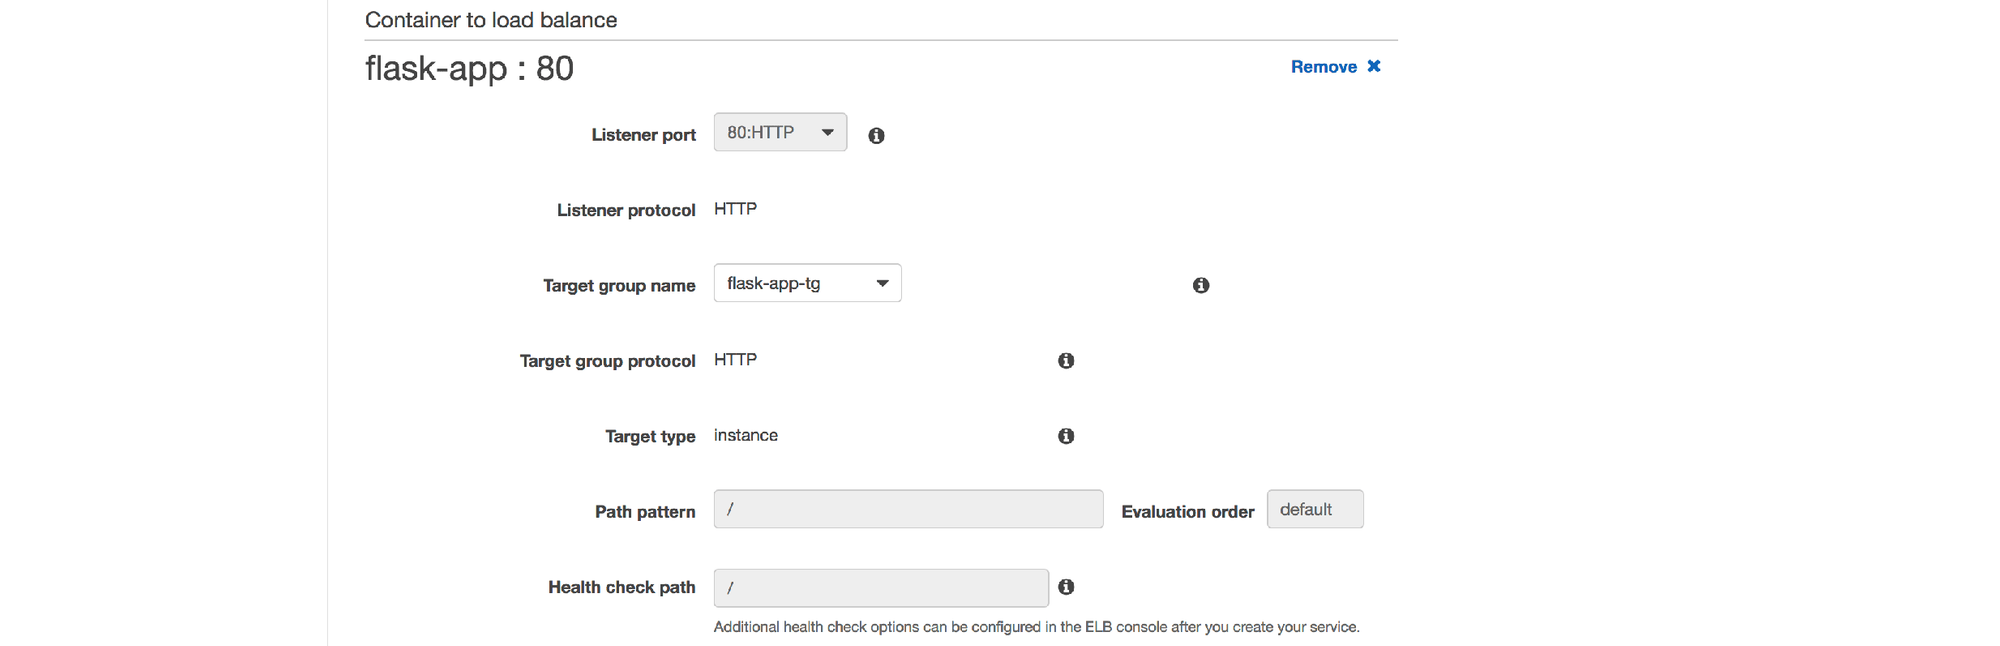
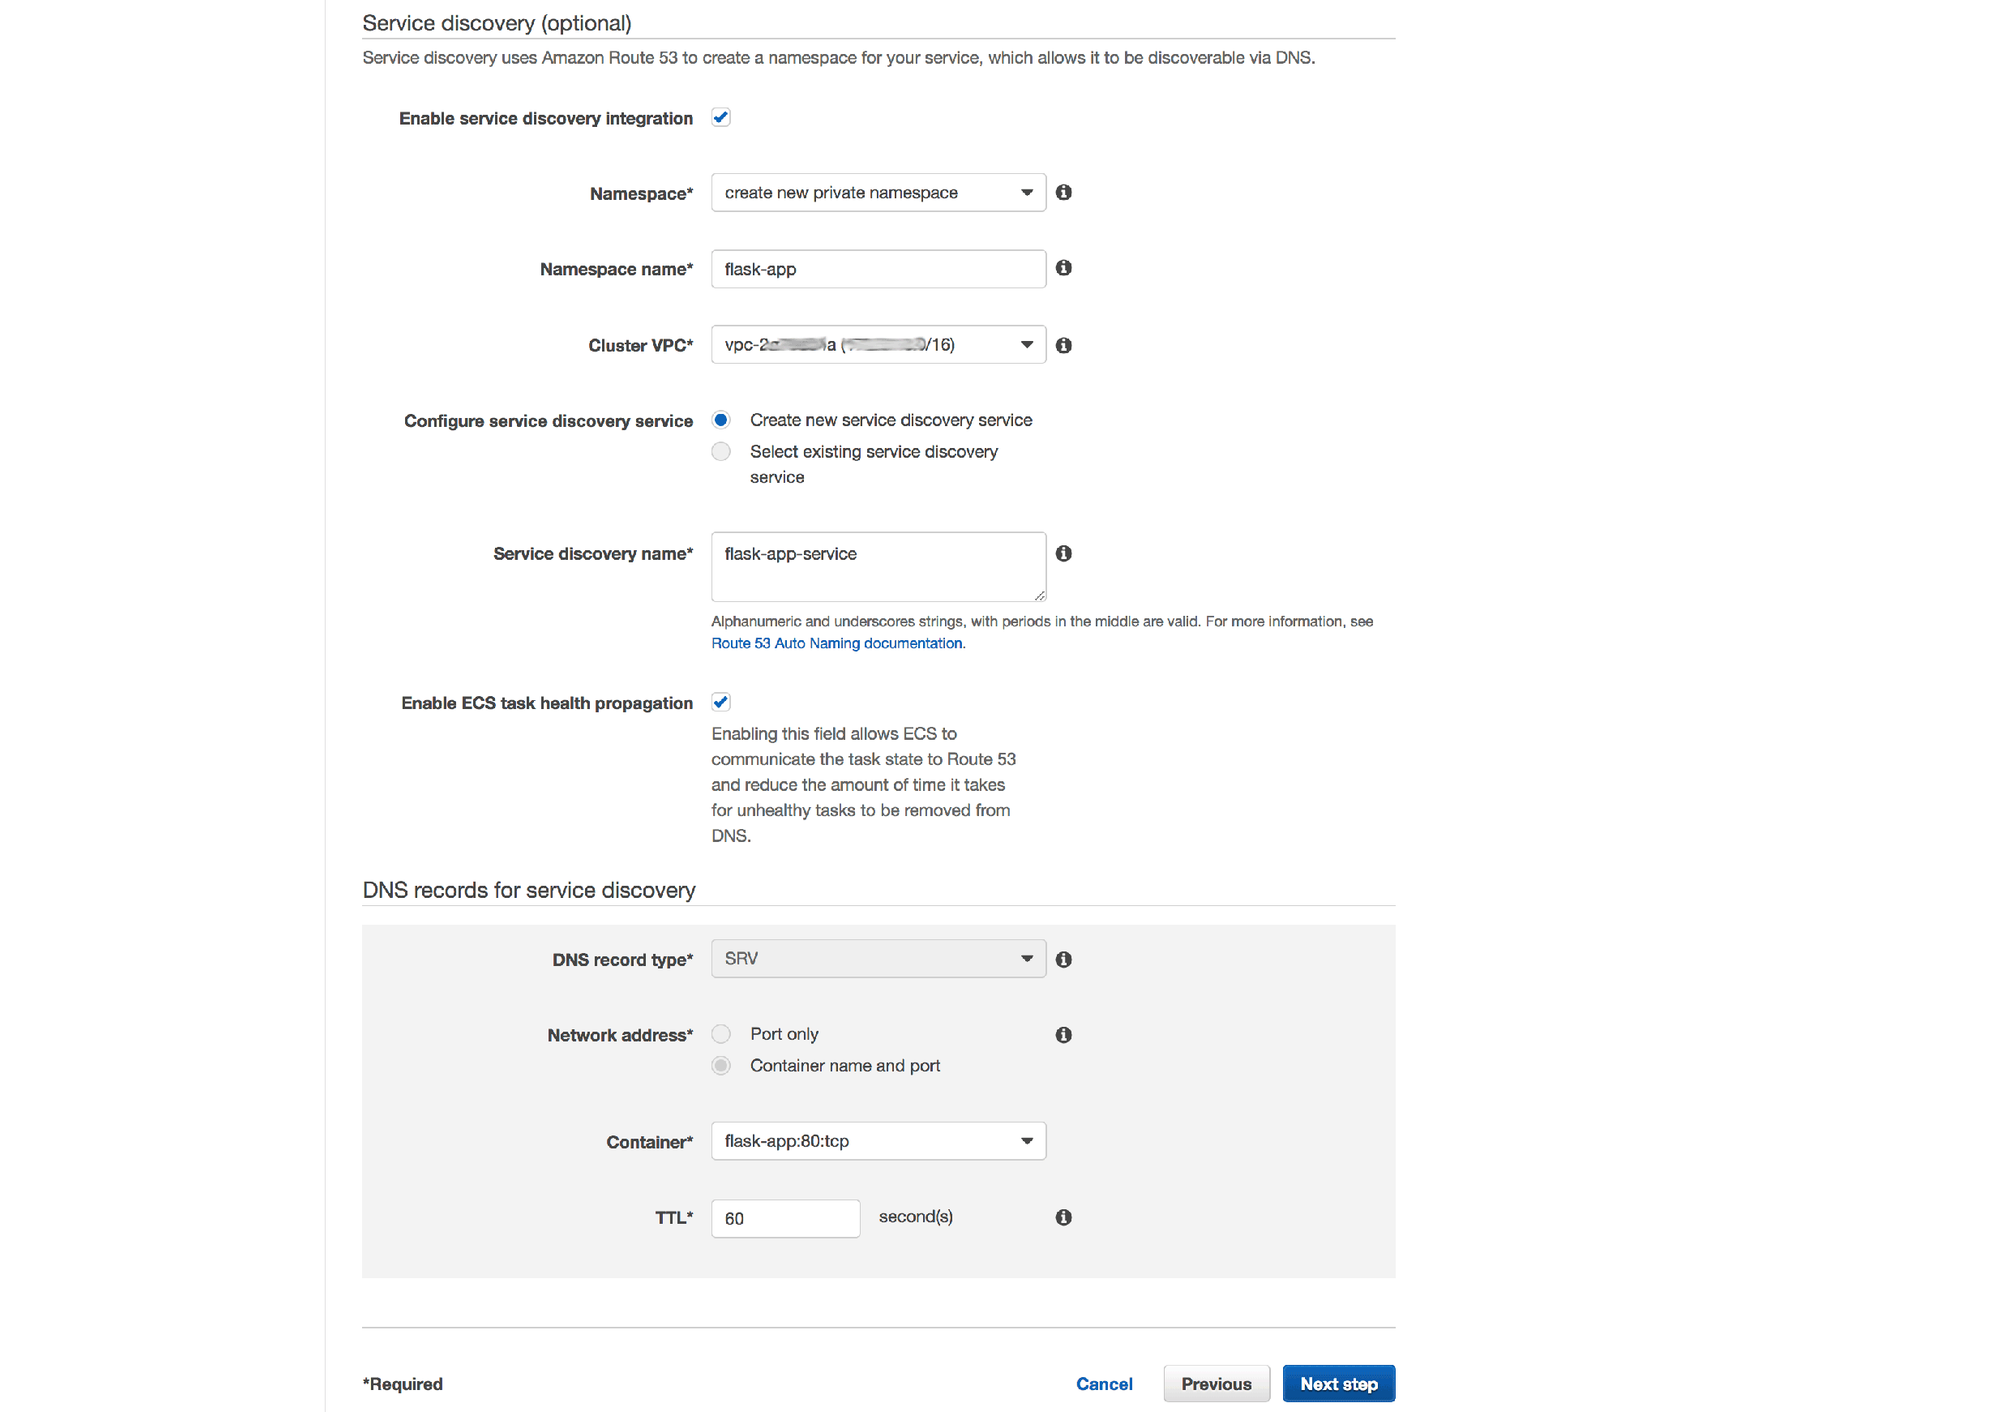
9. In the Service discovery section, enter "flask-app" for the namespace name, select your default VPC for the cluster and leave the other fields with their default values. Click Next step
10. For this example, we'll leave auto scaling turned off, so select "Do not adjust the service's desired count"
11. Continue through the rest of the wizard, accepting the review section in the next step
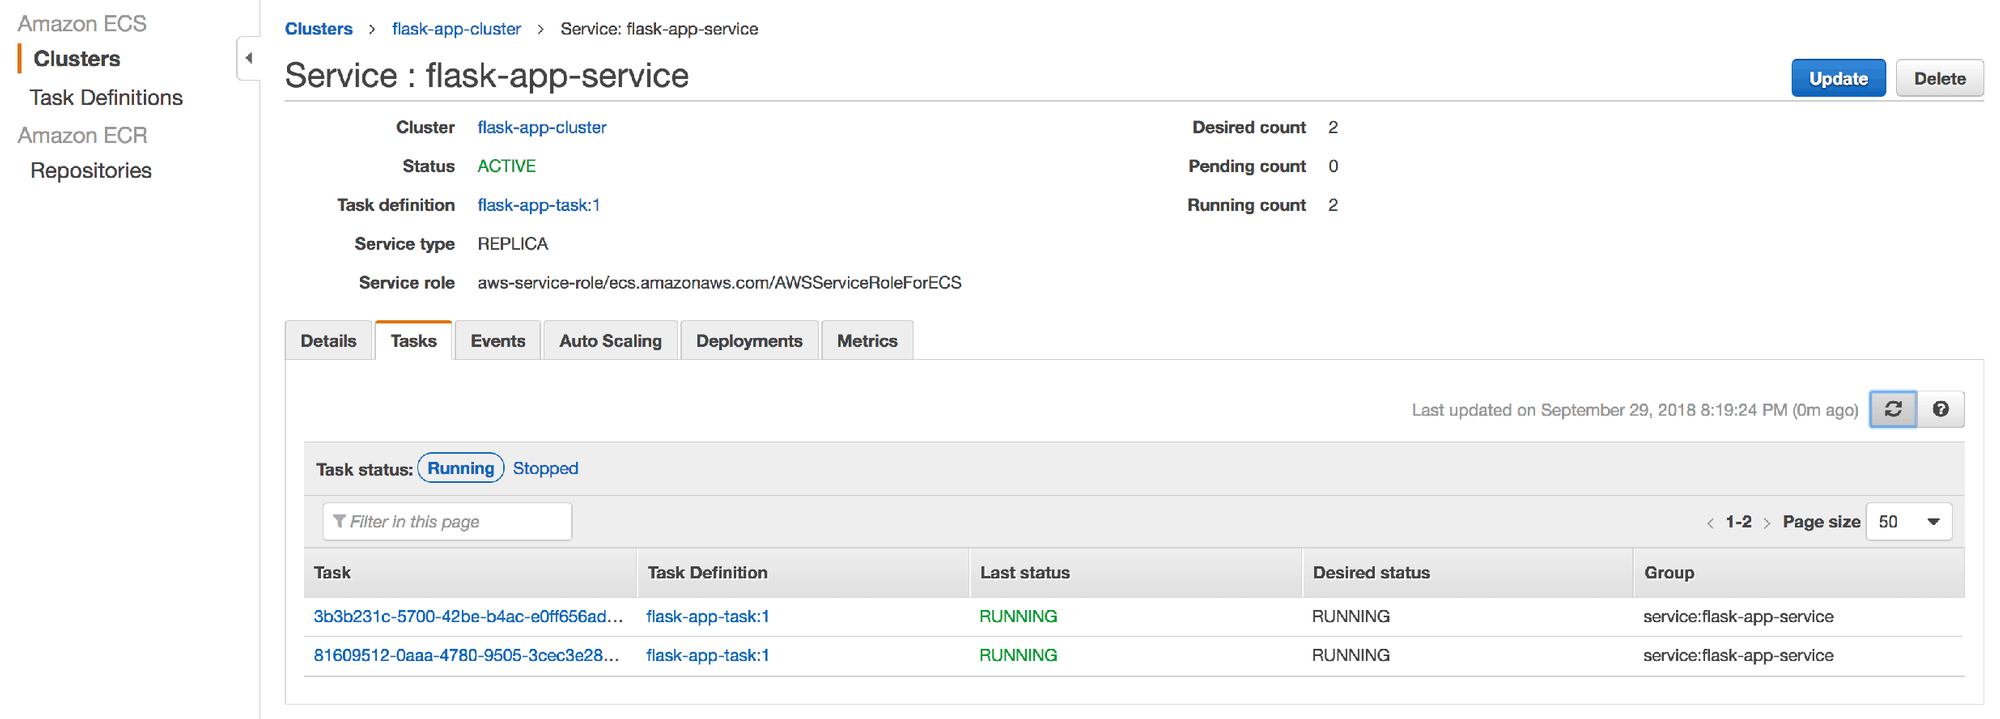
12. After a few moments, you should see 2 instances of the "flask-app-task" in the "RUNNING" state
Validate the Deployment
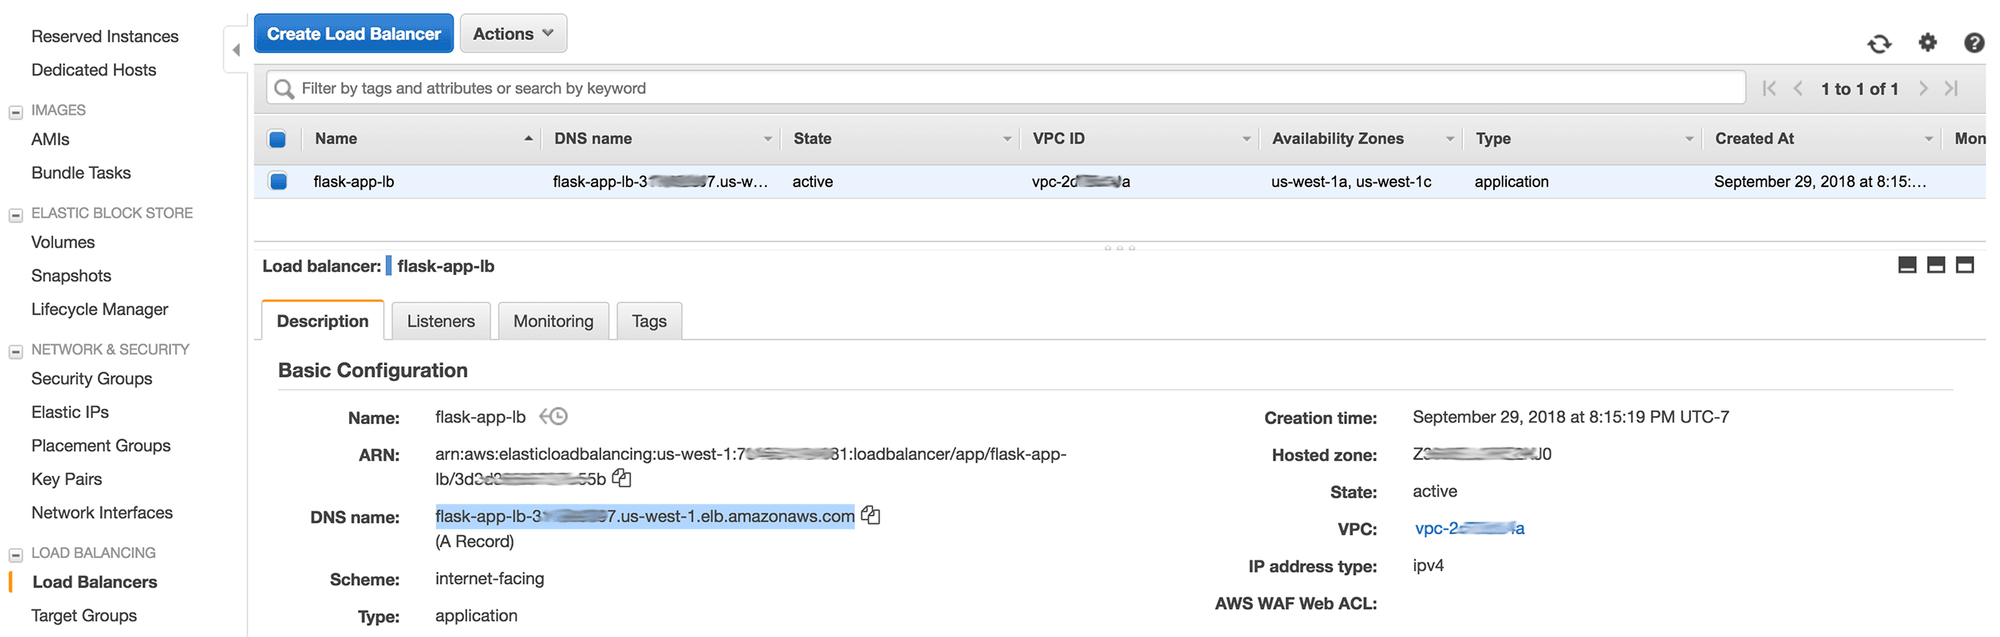
Now that the deployment is set up, let's make sure that it works. We haven't set up a custom domain (via Route 53 or otherwise) for the web app, so we'll need to use the DNS for the "flask-app-lb" load balancer:
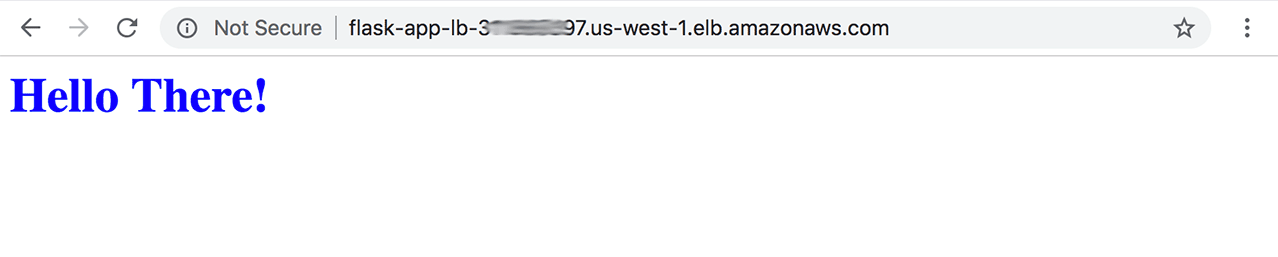
Enter this URL into your browser and if everything has gone well, you should see something like this:
Final Words
Hopefully everything has gone well and your initial ECS deployment is working as expected. This is only the first step of the process. The next step is to create the actual continuous deployment pipeline using Bitbucket and Jenkins. This is exactly what we'll cover in the next part of this post series.
On a side note, we've been very relaxed with security when putting together this ECS deployment. A few things that should be implemented to boost security of this app (and which will be covered in future posts) include:
- Using a custom VPC whereby the EC2 instances can't be directly accessed via a public IP. This is achieved through the use of a combination of public and private subnets and appropriate routing tables
- The use of bastion instances and custom instance ports for SSH connections. These bastion instances should use very strict traffic rules so that only trusted machines can gain access to the servers in the VPC
- Running the web app solely on the HTTPS protocol using SSL certificates generated by AWS, Letsencrypt or similar. Use of HSTS headers and opting into the HSTS preload list is also recommended
- Using tight IAM permission rules with MFA where available. AWS provides very powerful security measures for all of this